Metric Rafter Square
Rafter squares
RS


Characteristics
Features RS
- Lighter, more rugged multifunction square with mm/cm scale
- Multifunction: ruler, try square, miter square, angle meter, marking aid, saw guide, and rafter angle measurer
- End stop for precise marking of 90 and 45 degrees
- Rapid marking of miter cuts on ordinary rafters and hip rafters
- Marking aid for convenient measurement transfer
- Increased contrast enables outstanding measurement readability
| RS | |
| Item description | Rafter square |
| Material | Aluminum |
| Surface | coated |
| Color | black |
| Special characteristic | Working face, rafter angle measurer |
| Graduations | mm/cm, 1-piece, lasered |
| Scale grid | 1 mm |
| Angular dimension | 45°, 90°, variable 0° - 90° |
| Marking holes | 0.5 cm |
SOLA-Messwerkzeuge GmbH & Co KG
Unteres Tobel 25
6840 Götzis, Austria
+43 5523 533800-0
sola@sola.at, www.sola.at
Any warnings and safety instructions can be found in the User Manual or Safety Data Sheet in the “Downloads” section.
What Is a Rafter Square?
Rafter squares are in the shape of an isosceles right-angled triangle with a T-edge on one leg. The multitude of scales and recesses make the rafter square a multi-functional tool, which is ideally suited to marking lines and angles and as a scribing tool or saw guide. Rafter squares are usually made of steel, aluminum or plastic and have metric (millimeter, centimeter) or imperial (inch) units of measure. Common metric measurements include 18 cm and 30 cm, while for imperial measurements it is 7 and 12 inches.
Where Are Rafter Squares Used?
The different scales and recesses of rafter squares, as well as the practical T-edge, are primarily designed for use with wood – be this during carpentry, joinery or woodwork. Rafter squares originate from the Americas, where, to this day, they remain a key part of a carpenter’s toolbox during roof construction and for rafters. Hence why it is known as a rafter square. Rafter squares can be used to determine the rise and/or the angle for common rafters, hip rafters, and valley rafters, as well as jack rafters.
What Are the Features of a SOLA Rafter Square?
SOLA’s rafter square combines the functions of a ruler, try square, miter square, angle meter, scribing notches, saw guide, and rafter measurer. The rafter square in the shape of a right-angled triangle has a robust T-edge on one leg for precise 90° and 45° markings. The T-edge can also be used as a sawing aid or saw guide. Parallel to the T-edge, there is a recess with a metric scale in mm and cm (offset scale), which is ideally suited for marking perpendicular lines. The marking edge of the other leg also has a metric scale that allows for quick measurements. Below this scale, there is a recess with notches that can be used to mark horizontal/parallel lines. The hypotenuse has a degree scale for angle measurements between 0 and 90°. The desired angle is determined starting from the pivot point opposite (marked on the rafter square as PIVOT). Parallel to the degree scale there is another recess with two scales for miter cuts. The lower scale is for common rafters (marked on the rafter square as COMMON), while the upper one is for hip and valley rafters (marked on the rafter square as HIP-VAL). At a right angle to the degree scale there is a 90° marking guide for rafter seat cuts.
What Do the HIP-VAL and COMMON Markings on the Rafter Square Mean?
A special function of the rafter square, which is primarily used in the Americas, is the cutting of rafters. For this purpose, the rafter square from SOLA has a separate scale for common rafters, hip rafters, and valley rafters.The lower COMMON scale can be used to saw common rafters for a roof to size. The common rafters are the rafters that run from the ridge straight downwards. The scale is based on the rise of the rafter, which is specified in decimeters per meter. A conversion table can be found on the reverse of the SOLA rafter square. The table can be used to read off, for example, that once converted a rise of 1 decimeter per meter corresponds to an angle of 5.71°. The upper HIP-VAL scale is suitable for hip and valley rafters, which do not run straight downward from the ridge of the roof, but instead run diagonally. As hip and valley rafters are longer than common rafters, the HIP-VAL scale must be used for cutting.
How Do I Use a Rafter Square from SOLA?
MARKING OR CHECKING 90° ANGLES
The rafter square is ideally suited for marking 90° angles or checking whether an edge is a right angle. To mark a right angle, the rafter square is placed with the T-edge on the rafter or workpiece and a 90° line is drawn perpendicular to the T-edge along the marking edge.

MARKING OR CHECKING 45° ANGLES
The rafter square has a 45° angle, which can be marked quickly. For this purpose, the rafter square is placed with the T-edge on the rafter or workpiece and a line is marked along the long side of the rafter square. If the 45° angle needs to run in the other direction, the rafter square is simply turned over.

0–90° ANGLE MEASURER
Any angle between 0 and 90° can be measured using the degree scale on the hypotenuse of the rafter square. First, a starting point is specified from which the angle must be measured. This could be, for example, the end of a workpiece/rafter or a 90° line. Next, the rafter square is turned around the pivot point, which is labeled as PIVOT, to the desired angle on the degree scale (in the picture: 30°). Now the angle can be marked using a line along the marking edge. The degree scale on the rafter square can not only be used to mark angles, but also to read off angles easily.

TRACING PARALLEL LINES
Below the marking edge there is a recess with notches spaced 0.5 cm apart in order to mark or directly trace parallel lines with a pencil. In order to do this, simply put the pencil at the desired point in the recess and move it with the rafter square in a parallel direction.

MARKING OFFSET LINES
The recess directly below the T-edge is ideally suited for marking parallel lines perpendicular to the T-edge. In order to do this, for example, a reference line is marked first. Then the rafter square is moved until the reference line appears at the desired position on the offset scale. Now a new line is drawn along the marking edge.

SAWING AID
The SOLA rafter square can also be used as a sawing aid or saw guide in order to make perpendicular cuts. In this process, the rafter square is securely held in place, the saw is positioned and used to cut along the marking edge. It does not matter whether you are using a jigsaw or a hand-held circular saw. Miter cuts at a 45° angle are also possible.

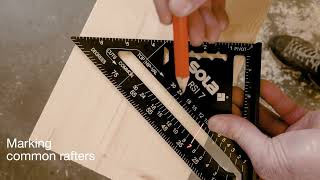
MARKING THE RISE FOR COMMON RAFTERS (COMMON)
The scale for common rafters (marked on the rafter square as COMMON) can be used to cut common rafters for a roof. In this case, the rafter square is applied and turned around the pivot point (PIVOT) up to the desired value on the COMMON scale. Then a line is drawn along the marking edge. In the photo, a common rafter with a rise of 7 decimeters per meter is being marked.

MARKING THE RISE FOR HIP AND VALLEY RAFTERS (HIP-VAL)
If hip rafters and valley rafters are being cut, this is carried out using the corresponding scale, which is marked HIP-VAL. The rafter square is applied and turned around the pivot point (PIVOT) up to the desired value on the HIP-VAL scale. Then a line is drawn along the marking edge. In the photo, a hip/valley rafter with a rise of 7 decimeters per meter is being marked.
